Prerequisite to run the application
-
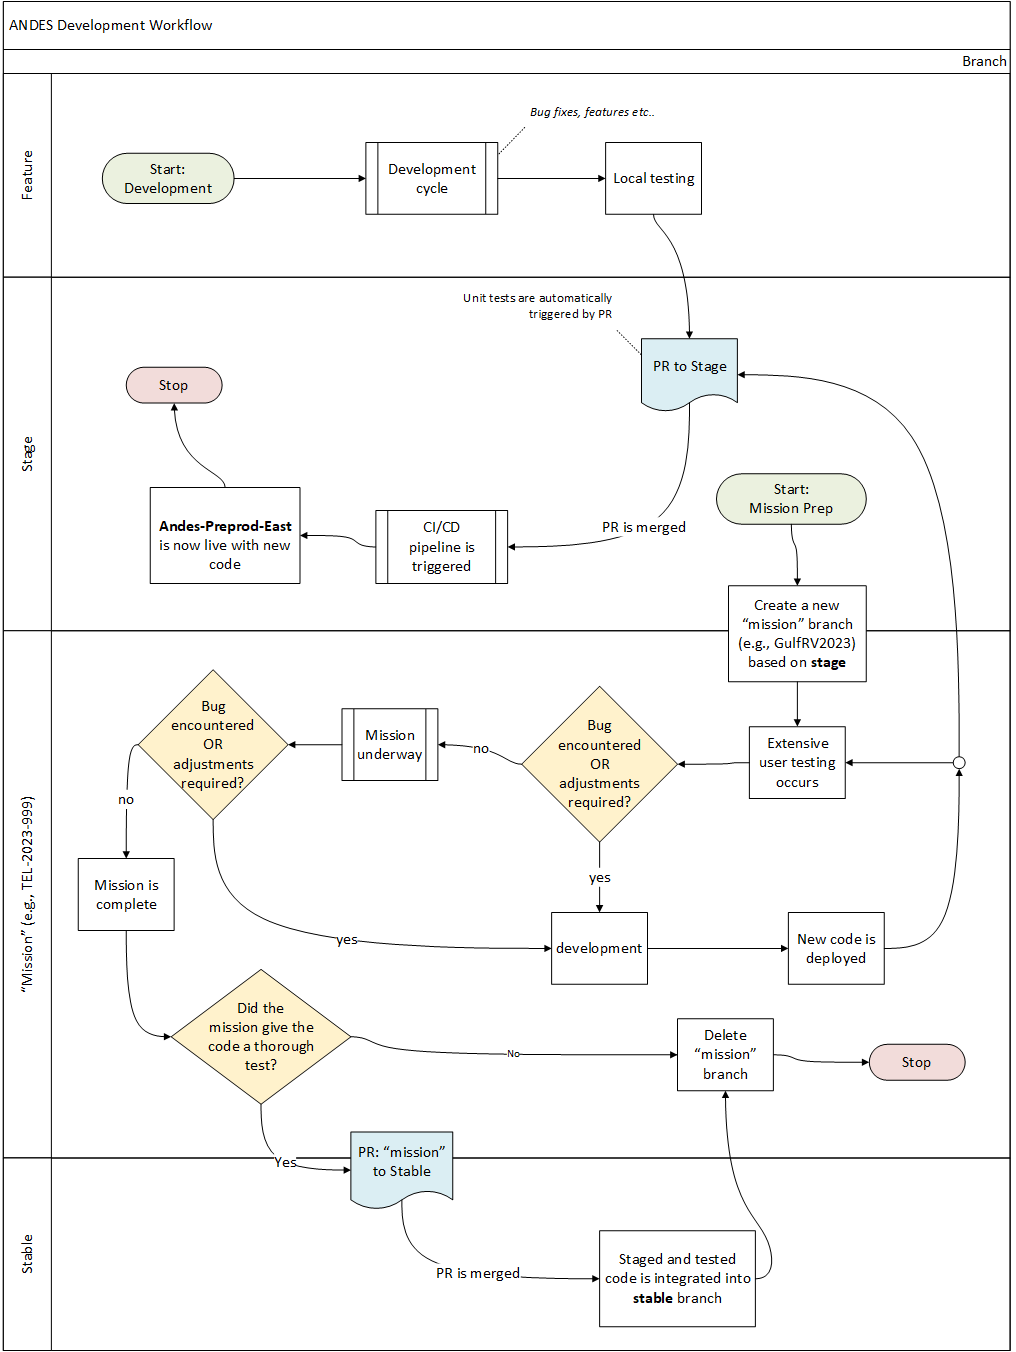
Make sure to look at the workflow diagram for this project

- Install Python (https://www.python.org), and make sure that Python is added to your PATH variable.

- on a fresh install of Ubuntu, make sure to also install
sudo apt-get install build-essential
- on a fresh install of Ubuntu, make sure to also install
-
Create a Python virtual environment and activate it. To do so, create a directory on your computer where the virtual environment will live (called p3_andes_venv in the example below), create the virtual environment in that directory and activate the virtual environment:
python -m venv p3_andes_venvNOTE: When deploying Andes into production on tablets and local systems (i.e., not when using with a web server), use the file system root dir as your starting point so that the two resulting folders are:
c:\andesandc:\p3_andes_venv(on windows). The reason for this is so that any shell scripts developed as a part of this repo will not where to find the project - Activate the virtual environment:
- on windows:
.\p3_andes_venv\Scripts\activate - on linux:
source ./p3_andes_venv/bin/activate
- on windows:
- Clone the Andes repository:
git clone https://github.com/dfo-gulf-science/andes.git - Move into the andes directory:
cd andes -
Install the Python packages required by the Andes application:
pip install -r requirements.txt -
Next, try running the following:
pip install -r special_requirements.txtIf you get an error, you will have to download a precompiled version of
mysqlclientandshapely.- The binary versions of these packages are available here:
- mysqlclient. Be sure to select the file that matches your system configuration.
- shapely. Be sure to select the file that matches your system configuration.
- So, for example, if your a running python 3.6 on an AMD64 processor, you would download the file called ‘mysqlclient‑1.x.x‑cp36‑cp36m‑win_amd64.whl.’. If you do not select the correct file version, it will not work.
- Once you have downloaded the files, you can install them as follows:
pip install /path/to/local/file/mysqlclient‑1.x.x‑cp36‑cp36m‑win_amd64.whlpip install /path/to/local/file/shapely‑1.x.x‑cp36‑cp36m‑win_amd64.whl
- The binary versions of these packages are available here:
Getting started with local development
- Change directory to the main Andes folder and run the server application (in not already there)
- If you are using a new database, the first step is to run migrations:
python manage.py migrate - Next, collect and compress the static files from your project into the staticfiles directory. This directory is a part of the
.gitignore:
python manage.py collectstatic - OPTIONAL STEP: load some data into your local database. To do this you will need to have an Andes backup file (
json):
python manage.py loaddata my_backup.json - Finally, fire up the django development server:
python manage.py runserver
Local configuration file
Without any customizations, the site will connect to a local sqlite3 database. This is an ideal, fast and simple option for local development. After running
the migrate command an empty sqlite database will be created in the project root called db.sqlite3. This file is already in the .gitignore file.
The first step of customizing the site’s configuration is by creating a file called .env and copy the following lines in it :
# DJANGO SETTINGS #
###################

# Django security key
SECRET_KEY = 123!*

# should debug mode be turned on or off? default = False
DEBUG = True
LOGGING_LEVEL = WARNING
DJANGO_LOGGING_LEVEL = WARNING
# whether or not the danger zone should be allowed on this instance
DISABLE_DANGER_ZONE = False

# CELERY CONFIGURATION #
########################
USE_CELERY = False
The .env file is also in the .gitignore. This file has numerous switches and flags that can be used for customizing the application.
Most types of customizations can be done through the .env file. However, changes to which type of database backend you want to use must be done in a separate
file. To do this type of customization, make a copy of the file called ./andes/default_conf.py to ./andes/my_conf.py. The latter file is in the .gitignore
therefore none of the changes made will be recorded to the repo. If the my_conf.py file is present when the application boots up, the default_conf.py file
will be ignored and the application will look to the my_conf file. At this point you would be free to make any changes you like to the my_conf.
If you are connecting to a mysql database, you do not need to make a custom my_conf. Instead simply provide the database credentials in the .env.
Important: You should not be making changes to the .env_sample and/or default_conf.py unless these are changes that are meant to be persist in the
repository for all users.
Connecting to a MySQL database (production or development databases)
Out-of-the-box, this program will assume you are going to be using a sqlite database. This is convenient for testing but not suitable for production in most cases. If you want to connect to a MySQL development or production database, do the following:
- Duplicate the example_env file and rename it to
.env. The.envfile is in the .gitignore and will therefore be excluded from the project repo. - Enter the appropriate connection information into the fields provided. E.g.:
DB_MODE=DEV DB_HOST=192.168.0.1 DB_PORT=3306 DB_NAME=my_fancy_dev_db DB_USER=my_username DB_PASSWORD=my_password - The above would provide a connection string to a development database. If it were a test or a prod database, you would set the
DB_MODEvariable toTESTorPROD, respectively.
If you are looking to connect to a database server other than MySQL, change the databases dictionary: my_conf.DATABASES. Please refer to
the Django Docs for more help on connecting to other databases.
What’s the deal with the .env file?
The env file is a convenient shortcut to creating pseudo environmental variables. This is possible thanks to the django-decouple library that is included in this project. If you wanted to add these variables directly in your environmental variable, it would work just as well.
** Unit Tests ***
Units tests serve to ensure an application’s functionality has not been impaired in the face of new development. All new development in the ANDES project should be accompanied by the development of unit tests. Similarly, it is good practice to run the full suite of unit tests before creating a merge request. Any failed tests that cannot be reconciled should be noted in the merge request comments.
Any pull requests made to the stage or stable branches will automatically trigger unit tests to be run using GitHub actions.